

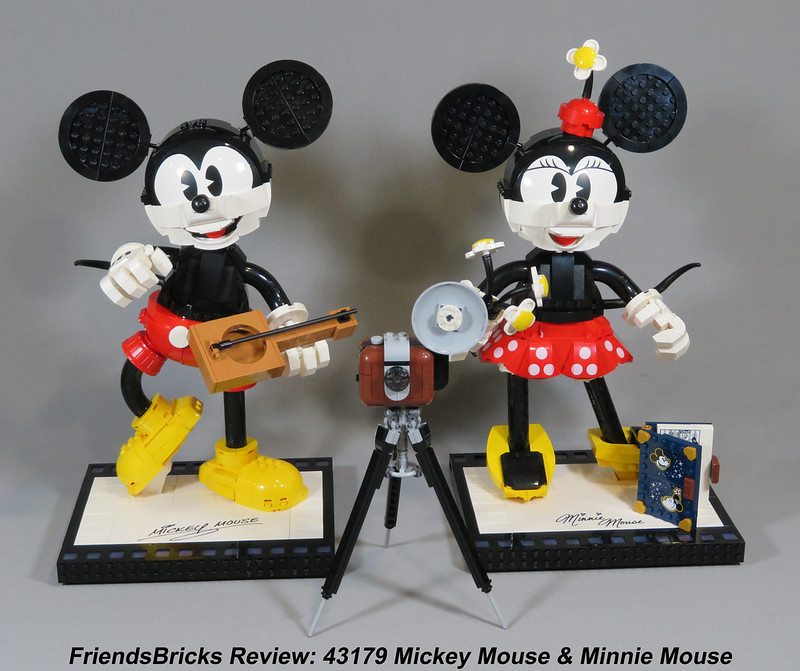
Before Snow White and the Disney Princesses, Mickey Mouse & Minnie Mouse paved the way for the success of the Walt Disney Company. Two buildable sculptures of these lovable mice are the perfect build to share your love of Disney and LEGO.

Set 43179 Mickey Mouse & Minnie Mouse Buildable Characters is a 1739 piece set designed for adult builders as part of LEGO's new 18+ branding that replaces the Creator Expert line. The set image on the box front shows Mickey Mouse holding a guitar and Minnie Mouse holding a bouquet of daisies. Both characters are presented on a white base with a black, film-frame border. Also pictured are a photo album and a vintage camera on a tripod.
The box design is clean and simple with the set shown against a solid black background. The set name on the box - Mickey Mouse & Minnie Mouse - is presented in clean, white, all caps text. The LEGO logo is in the lower left corner and the Disney logo in the lower right. A border of red LEGO pieces runs along the bottom edge. The age (18+), set number (43179), and piece count (1739 pcs) appear in white text on the red border.
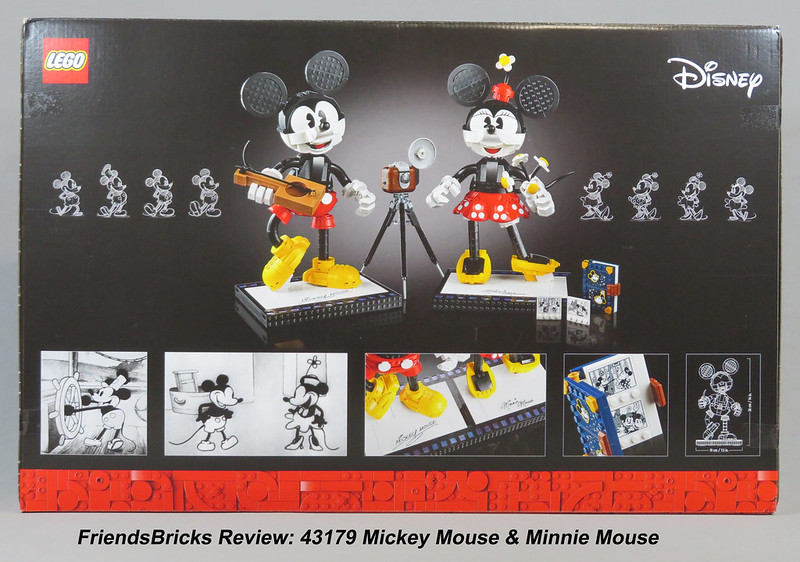
The black background and red LEGO border is continued around the sides and onto the back of the box. The image shows that Mickey Mouse and Minnie Mouse are on separate bases and can be displayed individually. It also shows the photo album closed with the photos sitting out of the book. Four white sketches of Mickey are on the left and four white sketches of Minnie are on the right. Underneath the main image are 5 inset images. Going from left to right, the first two images are film frames from Steamboat Willie. The center image shows the Mickey Mouse and Minnie Mouse signatures on their film-frame bases. Next is a close-up of the photo album - that looks really cute. The last image is a brick sketch of Mickey showing that the finished size of the character will be 36 cm (14 in) tall with the base being 19 cm (7.5 in) wide. Minnie will stand just a little shorter than Mickey, but the bases are the same size. The LEGO logo is on the upper left and the Disney logo on the upper right.
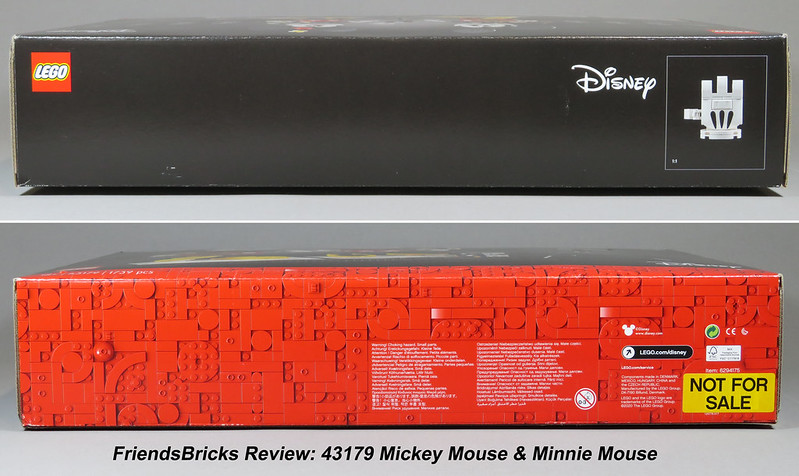
The top of the box is solid black with the LEGO and Disney logos. A thin white line creates an inset image showing a white gloved hand for the 1:1 actual size pieces. A white 1 x 2 ingot piece is clearly identifiable which helps make sense of what pieces are being shown at full scale.
The red LEGO pattern is extended across the bottom of the box. This is also were we find the choking hazard warnings, manufacturing and trademark details, and a link to both www.disney.com and LEGO.com/disney. As this is a pre-released, review set, the UPC code is covered with a NOT FOR SALE sticker.

The left side of the box has the LEGO and Disney logos at the top, and a white sketch of Mickey Mouse above the red LEGO bottom border. I was hoping to turn the box around and find Minnie on the right side, but it is just solid black with the red border and a tiny line of white text with the piece count. Both sides of the box have a punch out area to receive the tab on the inner flap for closing the box after opening.
It's an elegant box design that really stands out from sets designed for younger builders. I think it has good shelf appeal for adult collectors. Let's see what's inside.

There are 16 bags in the box, and nothing is loose. Large bags of parts are numbered 1 - 9. There 5 smaller bags of parts numbered 1, 4, 5, 8, and 9. The last bag of parts is a softer plastic with six 6 x 8 technic bricks with open centers, two 8 x 16 exclusive white signature tiles, and three technic 16 axles. There are two instruction books and a small sticker sheet in a last bag.
Before we start building, let's take a moment to look at the instruction books.

There are two perfect bound instructions books. Book one is for building Mickey Mouse (bags 1 - 4) and book two is for building Minnie Mouse (bags 5 - 8) and the accessories (bags 9). Both books follow the minimal aesthetic of the 18+ box design with a black background. The front of Mickey or Minnie are showing on the front of their respective booklets, and the back of Mickey or Minnie is shown on the back of their booklets. I really like that they are shown from behind on the back of the instructions. It's a fun detail.
The LEGO logo is displayed on the upper left and the Disney logo on the upper right. The set name is on the lower left. On the lower right of book 1 is a QR code that will link to LEGO.com/service/buildinginstructions, but both books have the link printed with link instructions in multiple languages. The books present all the information on a black background throughout. The white text and outlines are clear, but I know black backgrounds can be difficult for some people, so beware of this if it makes a difference for you.

The inside of the instruction books follow a similar format as other sets designed for adults. Inside book one, we start with an introduction to "The World's Favourite Mice," and a full page poster-style image of Mickey and Minnie on the facing page. Next is a short introduction to "Mickey in Walt Disney's Words" with the iconic image of Mickey at the wheel of the steamboat. The facing page has color illustrations of Mickey in a film-strip border set at an angle, and a larger white sketch of Mickey. Finally, we have a short note from designer Ollie Gregory, and a photo of him posing the Mickey Mouse figure.
The building instructions start with photos of Mr. Gregory showing the right and wrong way to pick up the finished model. Photo instructions on how to use the brick separator are on the facing page with a link to the website for further instructions. Pages 10 - 11 of the instruction book lays out how much of the build is covered in each bag, and we finally start putting bricks together on page 12.
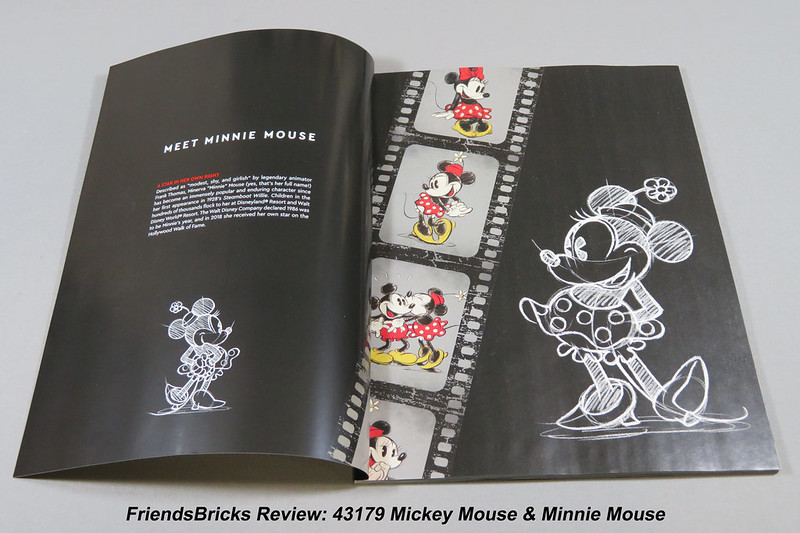
Inside book two, there is an introduction to Minnie Mouse. There is a small white sketch of Minnie instead of the animation image under the text. The facing page has color images of Minnie on a film-reel border, and a larger white sketch of Minnie just like the presentation for Mickey Mouse. These pages are followed by more notes from the designer and photographs of him and Minnie Mouse. Pages 6 - 7 show the build progression for Minnie Mouse.
I like that the two characters are split between two instruction books. This makes it easy to share the build experience with a friend or partner where you each build one of the figures. The overall look of the instructions enforce that this is a product designed for adults to enjoy.
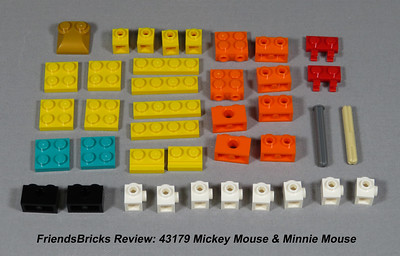
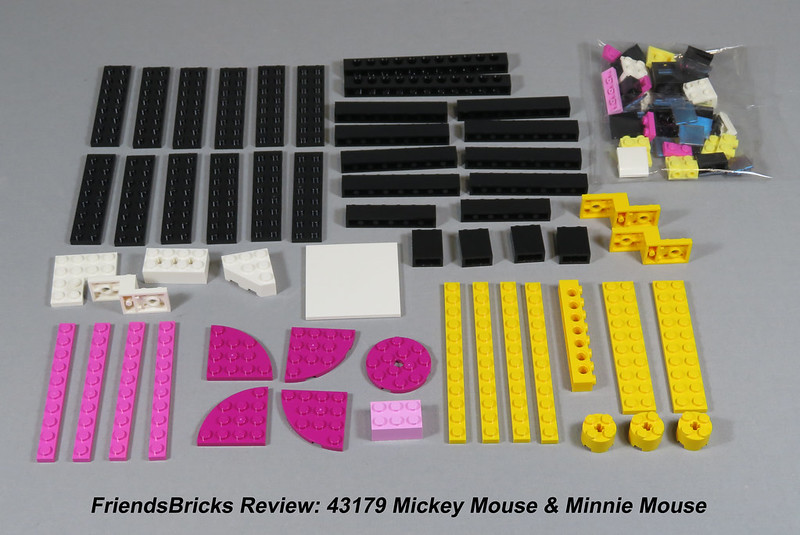
Time to take a look at what's in bag 1, of which there are two bags.

We will start with the larger of the two number 1 bags. A turquoise brick separator is included with this set, and there is another bag of smaller parts. Right away, we see that there are plenty of dark turquoise pieces included in this set. Dark turquoise is a recent enough addition to the LEGO palette that I'm still excited about getting more pieces in that color. Also of note is the 6 x 6 tile which has not previously been available in white.

The inner bag of smaller parts has 24 shiny, glittery, opalescent, 2 x 2 transparent window panes. I don't know what this color is officially called; I've seen reports of transparent brown opal, but the opalescence looks blue to me. Whatever the color is called, it's pretty and I like it. The photo can't really capture the iridescence of these windows.
Also of note here is the white ingot piece. This is a new color for the ingot in 2020 and is currently only available in 3 other sets.

The second, smaller bag numbered 1 has 21 orange 2 x 2 x 2/3 modified plates with 2 studs on the side. While this part came out in orange in 2019, it has only appears in 2 other sets. If you wanted more, this set has a lot of them.

Before we start building, we also pull out 3 of the white 6 x 8 technic bricks with open centers and the 8 x 16 exclusive white Micky Mouse signature tile. I'm so glad that is a print and not a sticker. The printing is good, and this is a great signature tile.

We start by building the base, which includes this clever little assembly for getting the correct angle needed to support Mickey's right foot (left foot as you are facing him). It took me a minute to figure out how this works, but once I had the orange 1 x 4 plates in place it made sense.

Just to give you an idea of how colorful the interior of this is, here's the base before we start tiling it over. I appreciate the variety of color as it helps to see clearly what's being added in each step.

Here is the completed base and 5 leftover technic pins. I love how those windows create the film perforations. They have such great shimmer.
But that seems like a lot of pins leftover. Looking back through the instructions, I missed the 4 pins in the very first step. While there should only be 1 technic pin leftover, the build is sturdy enough that it was holding together just fine without them. Remember above when I mentioned the black backgrounds on the instructions? I am one of the people who find them difficult, and black pieces on a black background are easy to miss even with a white ouline. Oops.
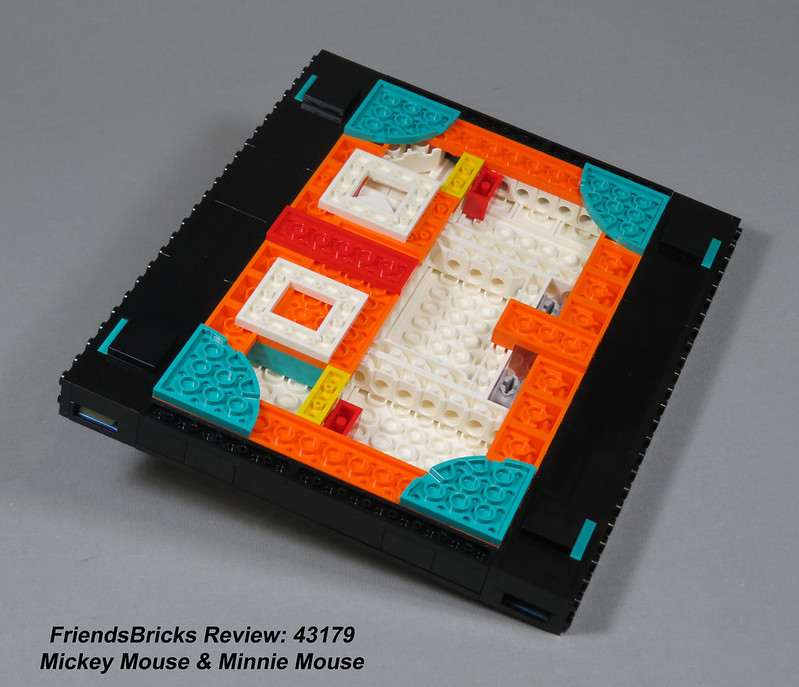
This is what the underside looks like. It's very colorful, but none of it is visible unless you decide to display this on a glass shelf above eye level.
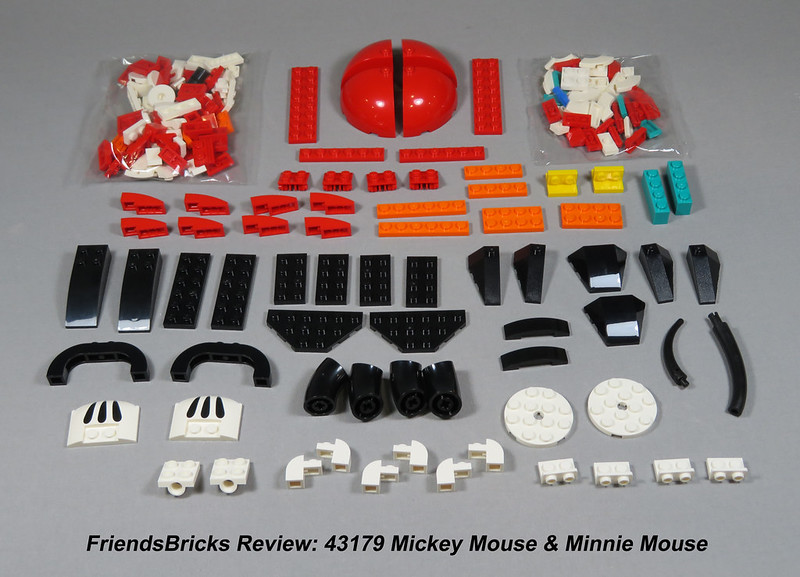
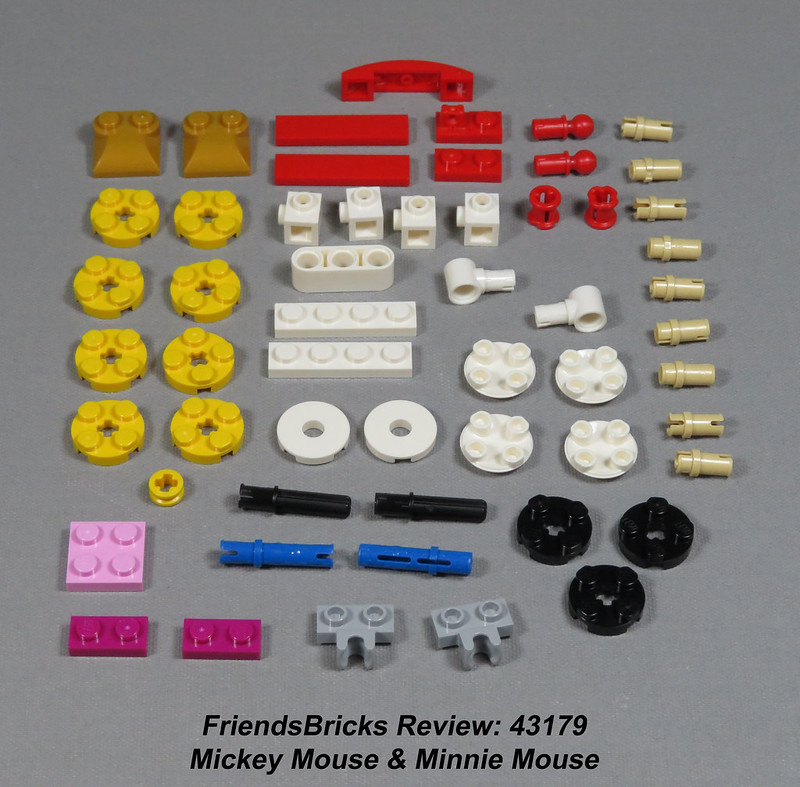
Mickey is built from the bottom up, so let's get started on bag 2 and his shoes.

There is only one bag numbered 2, but it has two bags of smaller parts inside. We will also use the first technic 16 axle from the soft bag. There are a lot of great new or recolored parts here.
The black 2 x 2 round tube with 45 degree elbow and axle hole is a new part for this set, so I don't have the official part name (the folks over on New Elementary called it the Mickey Macaroni).
The black 1 x 2 x 1 2/3 modified bricks with studs on 3 sides are also new parts.
The list of newly recolored parts in bag two is lengthy:
- The large half barrel with axle hole has never appeared in red before, though a similar piece without the axle hole was used in the Fabuland set 3683 Amusement Park in 1988.
- The 2 x 4 x 1 1/3 windscreen piece is a new in yellow. It usually appears as a printed piece in the Disney Cars sets, but none of those are in yellow. It has also appeared unprinted in red in just two sets.
- New in yellow and so far exclusive to this set are the 3 x 6 round half plates with 1 x 2 cutout, the 4 x 4 square, locking turntable base, and the 1 x 2 x 1 2/3 modified brick with studs on 1 side.
- The 3 x 3 x 2 round corner brick with dome top is new in yellow for 2020. It also appears in set 75551 Brick-Built Minions and Their Lair.
- The 2 x 4 bricks with 3 technic axle holes were new in 2019, but are so far exclusive in white for this set.
- The 2 x 2 round brick with axle hole is another new turquoise piece for 2020 and appeared in 3 other sets earlier in 2020.
The black 2 x 2 x 2 barrel is very rare. First appearing in set 1682 Space Shuttle (1990) and then not again until set 21322 Pirates of Barracuda Bay (2020).
Other recent parts of note include the orange 3 x 2 x 1 1/3 brackets and the orange 1 x 1 x 1 2/3 modified bricks with studs on 1 side; both first showed up in 2019. The only other set the bracket appears in is set 60226 Mars Research Shuttle (2019). The modified brick only appears in four other sets.
Finally, the bright light orange 2 x 6 technic plate with 5 holes has only appeared in set 45300 WeDo 2.0 Core Set back in 2016.
Whoo! That's a long list of parts in this bag.

The first of the two bags of smaller parts has two more 2 x 2 x 2/3 modified plates with 2 studs on the side in orange, and two 2 x 2 plates in turquoise.
The second bag of smaller parts has a couple more pieces newly released in yellow. The 2 x 1 wedges with stud notches on left or right have only otherwise appeared in set 76897 Audi Sport quattro S1 (2020) in yellow.
All these new and newly recolored pieces in bag two will build Mickey's feet, legs, and the core of his torso.

The build for the shoes and legs is terrific. I love how this snaps onto the base to get the pose correct. The red half barrels are perfect for the legs of Mickey's shorts.

The interior structure for Mickey's torso finishes up the parts from bag 2 with just one yellow technic half bush leftover. The torso structure uses a lot of sideways building pieces to setup for SNOT (studs not on top) building Mickey's body. All that orange and turquoise will be covered with the bricks in bag 3, so let's see what we have to work with.
There is just one bag 3 which includes two bags of smaller parts. The first things to grab my attention are the custom prints on the 3 x 4 x 2/3 triple curved wedges (car hoods), and the four red 4 x 4 x 2 2/3 round corner bricks with dome tops. We also get 4 more black 2 x 2 round tubes with 45 degree elbow and axle hole. The 2 x 2 tile with centered 1 x 2 bracket were new in 2019 and have appeared in yellow in 5 other sets.


The only new pieces in the two inner bags of smaller parts are two more of the previously mentioned white ingots. I personally appreciate getting more 1 x 1 modified rounded plates with handles, especially in white.
Let's keep building...

We finish the torso and add the tail. The tail can be moved side-to-side, and the tip rotated to change the pose a little bit. Next up are the arms and hands.
We have now finished bag 3 with just one leftover 1 x 1 white plate. You can alter the position of the arms a little by changing how the two curved tubes are aligned on their axles. The hand will rotate on the wrist, and the thumbs will bend, but the fingers are stationary. I found it easier to adjust the arms and then put the fingers on as they are only secured by one stud and fall off easily if you are trying to reposition the arms.
Headless Mickey is a little disturbing, so we better keep building.

Once again we have two bags numbered 4, and we will open the larger bag first. You can't miss the new dual-molded 10 x 5 x 1 2/3 half dish printed with Mickey's eyes. No worries about the white being printed too light on a black dish as this is made with two colors of plastic, with black printing for the pupils. It's really nice.
We also get a few newly recolored parts in this bag. There is another 2 x 4 x 1 1/3 windscreen piece, this time in white. There are two modified 2 x 4 - 1 x 4 bricks with 2 recessed studs and side arches in black. We also get two 4 x 4 x 2 2/3 round corner bricks with dome tops in black.
A couple more orange 2 x 2 x 2/3 modified plates with 2 studs on the side show up again. The 2 x 6 brick in dark turquoise has only appeared in set 70849 Wyld-Mayhem Star Fighter.
Let's see what's in those two inner bags.

The first inner bag has a classic-style black space helmet which I know a lot of people will be excited about. Also, another white ingot, and more dark turquoise pieces. Nothing immediately jumps out from the second inner bag.

The smaller bag numbered 4 has lots of black slopes and curved pieces. Nothing really noteworthy other than more dark turquoise pieces.
Time to finish building Mickey.

Here is the start of the inner structure for Mickey's head. I loved seeing how this got built up to get the final shaping. There is a lot of LEGO maths happening to get these studs in the correct spots.

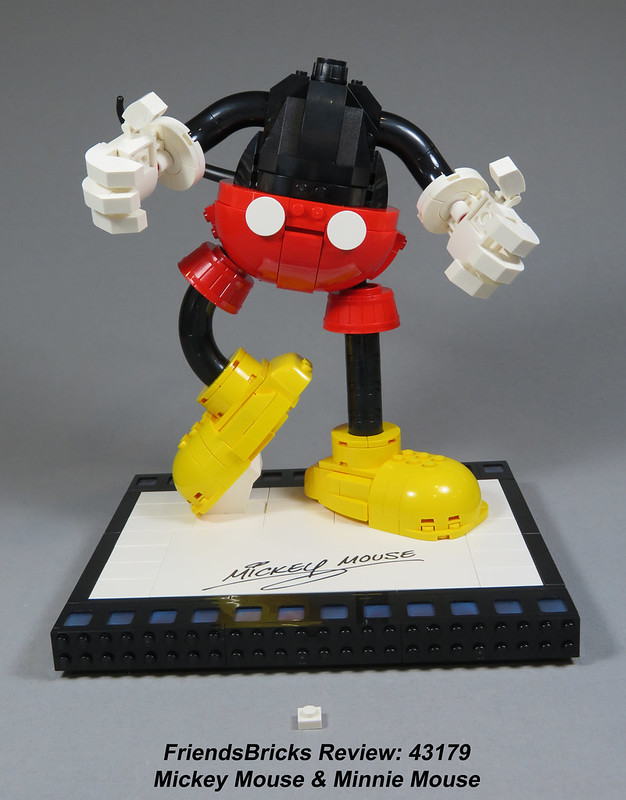
Mickey Mouse is complete with just two small pieces leftover from all the number 4 bags.

This is a really nice build with a lot of advanced SNOT techniques. I haven't built many sets designed specifically for adult builders, so this was a real treat for me personally. But now Mickey needs to meet Minnie.
As we have already taken a look at the second instruction book above, let's jump right into bags number 5, of which there are again two.
As we open the larger bag numbered 5, the first thing that strikes me is that we will be changing the colors for the internal structure. While Mickey used a lot of orange, dark turquoise, and red for the interior structure, it looks like Minnie will be using dark pink, magenta, yellow, and bright light yellow. This seems like a trivial detail, and no one will see it in the finished models, but I appreciate that change of colors between the two builds.
Of note in this bag is another white 2 x 4 brick with 3 technic axle holes and another white 6 x 6 tile . The 5 x 2 x 1 1/3 bracket with 2 holes is rare in yellow only previously used in set 21307 Caterham Seven 620R (2016).

The inner bag of smaller parts has 24 more of those lovely window panes for Minnie's film-frame base. The modified 2 x 2 x 2/3 plates with 2 studs on the side are new in light bright yellow.

In the smaller of the two number 5 bags, we get more light bright yellow modified plates with 2 studs on the side.

Before we start building Minnie's base, we grab the other three white 6 x 8 technic bricks with open centers and the 8 x 16 exclusive white Minnie Mouse signature tile. This is another great print. I love that Minnie dots her i's with hearts. Now we are ready to start building Minnie's base, and I promise to remember all the technic pins this time.

Here's the completed base for Minnie, which includes the start of her iconic stiletto heels. Because of the change in footwear and pose, the base is a slightly different build from Mickey's.

Underneath, you can see how the interior structure colors have changed from Mickey's base.

There is just one bag numbered 6, with one inner bag of smaller parts. Inside are more bright light yellow modified 2 x 2 x 2/3 plates with 2 studs on the side. We also get another white 2 x 4 brick with 3 technic axle holes. The pearl gold technic belt wheels are fairly rare. They first appeared in 2019 and are only in 6 other sets.
The inner bag of small parts has red technic pins with tow balls. These aren't particularly rare (it's in 15 other sets), but it is fairly new having first appeared in 2019.
Bag 6 will build Minnie's legs and her internal torso structure, so we also grab the last two technic 16 axles from the soft plastic bag of parts.

Mixel ball-joints are used to get Minnie's left leg (right as you look at her) in the correct position for a toe-up pose. The LEGO designer was really clever at getting dynamic poses for both Mickey and Minnie. At the end of bag 6, we have two leftover parts - a technic pin and bush.
Bag 7 will finish Minnie's shoes, torso, arms, and hands, so let's look at what's inside.

Bag 7 has two inner bags of smaller parts. We get more black 2 x 2 round tubes with 45 degree elbow and axle holes, and two more printed 3 x 4 x 2/3 triple curved wedges (car hoods) used for the backs of the gloves.
Minnie's skirt will be made up of red, polka-dot printed 5 x 8 x 2 windscreens and 4 x 3 wedges with no studs. The windscreens are new in red, and the wedges only appear in red in two other sets. The polka-dot print on both is exclusive to this set.


The first inner bag of small parts has more yellow 2 x 1 wedges with stud notches on left and right. Nothing else in the two bags is particularly new or rare.

Let's stop and take a look at Minnie's skirt and shoes before we finish with bag 7. I like how the 4 x 1 double curved slopes give the hem of her skirt a rounded edge. The windshield and wedge printed pieces give the skirt a lot of flounce. It's so cute!
We have also finished Minnies shoes. The way they are fit around her legs is great.

With bag 7 complete, Minnie's hands and arms are finished. These are built the same as Mickey's. There are two spare 1 x 1 plates left. The red axle connector makes headless Minnie even more disturbing than headless Mickey was, so we will just move right along with bags 8.
Just like Mickey, there are two numbered bags for Minnie's head, and we will look at the larger bag 8 first.

There are a lot of new parts in bag 8, many of which we have already seen while building Mickey so I won't repeat those other than to point out the dual-molded 10 x 5 x 1 2/3 half dish which has a different print for Minnie's eyes.
Not seen while building Mickey are the new pieces for Minnie's hat. Both the 3 x 3 x 1 1/3 round brick with dome top and the 4 x 4 round brick with recessed center are new in red. Both pieces are rare in any color. The dome brick was new in 2019 and as only appeared in 3 other sets, twice in light bluish grey and once in pink. The round brick with recessed center was new in light bluish grey in set 75551 Brick-Built Minions and Their Lair (2020).
The 4 x 4 flower with rounded petals is also rare, and exclusive to this set in white. It first appeared in dark pink in two Unikitty! sets in 2018 and then again in set 41253 Lonesome Flats Raft Adventure (Trolls World Tour 2020).


In the first inner bag of smaller parts, the 1 x 1 plate with 1 x 1 bracket is new in black for 2020, first appearing in set 71721 Skull Sorcerer's Dragon.
The 2 x 2 round plate with rounded bottom (boat stud) in yellow is rare. It has only been used in 4 other sets since 2000.
We also get another classic-style black space helmet.
The second inner bag has another white ingot.

The smaller bag numbered 8 has more light bright yellow modified 2 x 2 x 2/3 plates with 2 studs on the side. The 1 x 2 modified bricks with studs on 1 side are also new in light bright yellow.
The dark pink 1 x 2 plates with 1 x 2 inverted bracket are not new, but they have only appeared in 5 other sets starting with wet 21308 Adventure Time (2017).

At the end of bag 8, there are four leftover pieces. Because of the change in neck attachment and the hat, Minnie's head is again slightly different from Mickey's. That hat is just perfect. Just like building Mickey there are a lot of advanced SNOT techniques and LEGO maths building Minnie, but still has enough about it that is different.
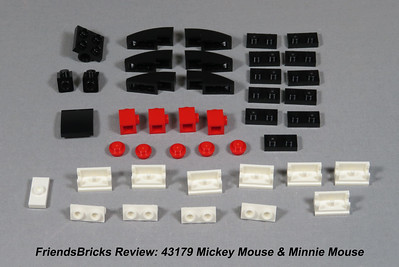
Minnie Mouse may be done, but we aren't quite finished building this set. Mickey and Minnie still need their accessories, built from the parts in bags 9.
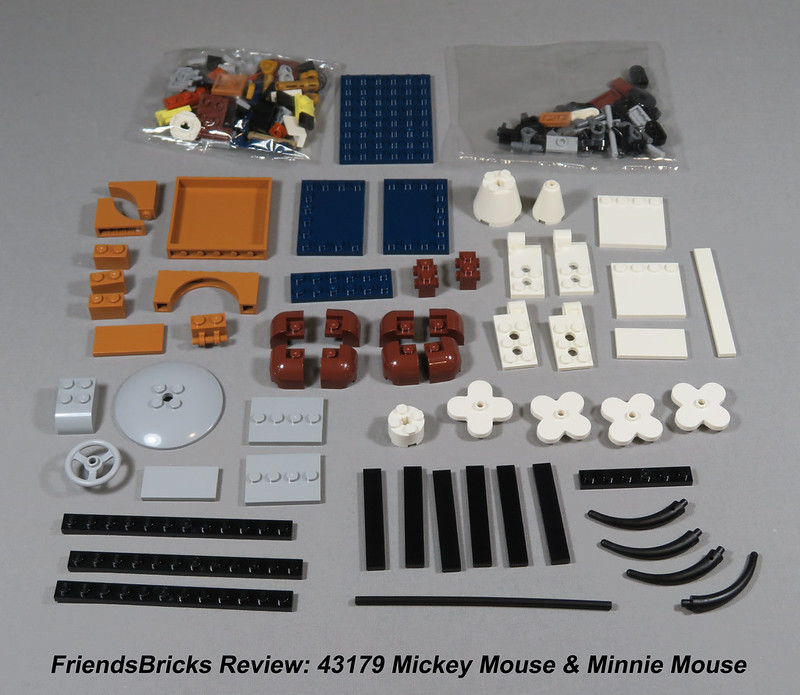
Starting with the larger of the two bags numbered 9, the big standout is the new reddish brown 2 x 2 x 1 1/3 rounded corner bricks. This is a rounded corner brick that will match up with the existing 1 x 2 x 1 1/3 modified brick with curved top. This is a fabulous new part to get, and I can't wait to see it come out in more colors.
The 1 x 6 x 5 panel piece is new in medium nougat. We also get four more 4 x 4 flowers with rounded petals in white.


There are two inner bags of smaller parts. In the first bag, we get two black carrot tops. This was a new color in 2019 and only appears in three other sets. We also get three reddish brown ingots which aren't rare, but was a new color just last year, in 2019. We also get a few more black 1 x 1 plates with 1 x 1 inverted bracket.
In the second inner bag, we get 5 new pearl gold 1 x 1 heart tiles. These have only appeared in two Ninjago sets earlier this year. I'm so excited to see these. Also new in pearl gold for 2020 are the two 3L technic pins with friction ridges and stop bush.
The two 1 x 2 plates with 1 x 2 inverted brackets are new in bright light yellow. The dark orange 1 x 1 plates with 1 x 1 bracket are not rare but worth mentioning since they were new in 2019.

In the second, smaller bag numbered 9, the 2 x 2 inverted tiles in medium nougat are a new color for this set. As are the 2 x 2 plates with 1 x 2 centered bracket in medium nougat.
The 1 x 3 inverted tile with hole in black have only appeared in set 76139 1989 Batmobile (2019).
The last parts of note are 4 more yellow boat studs. Let's get these accessories finished.

The first accessory we build is a bouquet of flowers for Minnie. These flowers match the one in her hat. The black carrot top is used at the tip of the bouquet.

The bracket on the side of the bouquet attaches to the inside of Minnie's hand so she can hold the flowers. They are just so cheerful.


Next we build the photo album, this is where we will use the 4 stickers. These are the only stickers in this set, and they are perfect for the photo album cover and the photos inside. I think the photo album is cute. The gold heart tiles on the corners are a beautiful detail, and the reddish brown ingots make a convincing clasp. I'm so glad that the pins holding the two sides of the photo album together come in pearly gold; it just wouldn't look as good if the pins were grey or red.
But in order to have photos, someone needs a camera to take them.

Next we build a vintage camera and tripod. I really enjoyed this little side build. Those new corner bricks are terrific, and the tripod is a clever design.

Mickey's guitar is the last accessory we build.

Like Minnie's bouquet, the guitar attaches to Mickey's hand with a bracket. Unlike Minnie's bouquet, the guitar only attaches with two studs instead of four. This makes a less secure connection than the bouquet, and getting it to look right in Mickey's hands can be tricky. The arms and hands need to be just right so it has room to get past Mickey's body, and it still tends to catch on the buttons on his shorts. This can be useful. In the first pose I tried, the guitar lightly rested on one of the buttons, and this prevented it from swinging down, since the wrists don't have much friction.
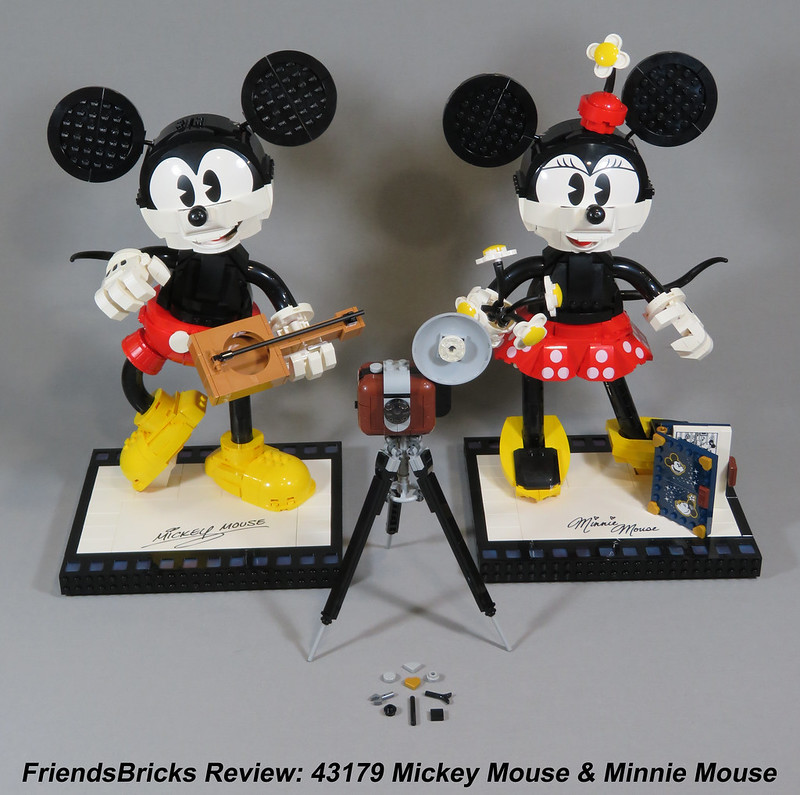
Here is the completed build with the last leftover pieces from bags 9.

And this is all the spare parts left from the entire build (I went back and put the four forgotten technic pins in Mickey's base after I discovered my mistake).
Summary:
This was a super fun build and definitely designed with adult builders in mind. The two figures are different enough that you won't find them repetitive if you are building alone. If you choose to build one while a friend builds the other, they are similar enough that you should be able to work together side-by-side comparing the differences as you go.


I only have two minor complaints about this set. One is the black background on the instructions. This is just a bad background color for me personally. The instructions are clear and well presented, so it probably won't be an issue for most people.
My other complaint has to do with posing the figures. As I pointed out above, it can be difficult to get the guitar in position. I played around with the positioning a lot. As I built them, they were fine, but I wanted to change the accessories to be in the outside hands and I wanted to be able to push the two bases together. It look me several tries to get them posed the way I wanted, and in the process I kept knocking off the fingers. The new curved 2 x 2 tubes are held together with axles. This is a very secure connection which is great for keeping the arms in place, but it can get frustrating if you are trying multiple arm positions since they can't simply rotate. Because this is really a display piece and not a play set, fussing with the arm positions is a one-time frustration while you get the look you want.


Overall, I am impressed by the design and I think it looks great. AFOLs will be excited about the new parts. Disney fans will love these iconic characters. I found it to be a challenging build but not overly frustrating (other than being picky about the final arm positions). There are a lot of great advanced techniques - they may not be new for more experienced builders but for the casual or new adult builders they will be impressed. I think this would be a great build for AFOLs to build with their significant other even if they don't normally build with you. I know I would have enjoyed building this with my husband.

I want to give a special thanks to my husband for researching new parts while I was building. It would have taken me much longer to get the parts research done for this review without his help. Anything I missed or mistakes are solely my fault.

Here's one last photo of the set with my Mickey Mouse and Minnie Mouse collectible mini-figures for scale. Please note, NO minifigures are included in this set. I pulled these from my collection just for a size comparison.
Leave a comment and let us know what you think of Mickey Mouse & Minnie Mouse. What you are most excited about in this set?
--
Disclaimer:
This set was provided by The LEGO Group for the purpose of sharing set details with fans.
Opinions provided here solely reflect those of our reviewer.
Photographs are property of Friends Bricks and are not directed by TLG in any fashion.
Thanks for this great review!!
ReplyDelete